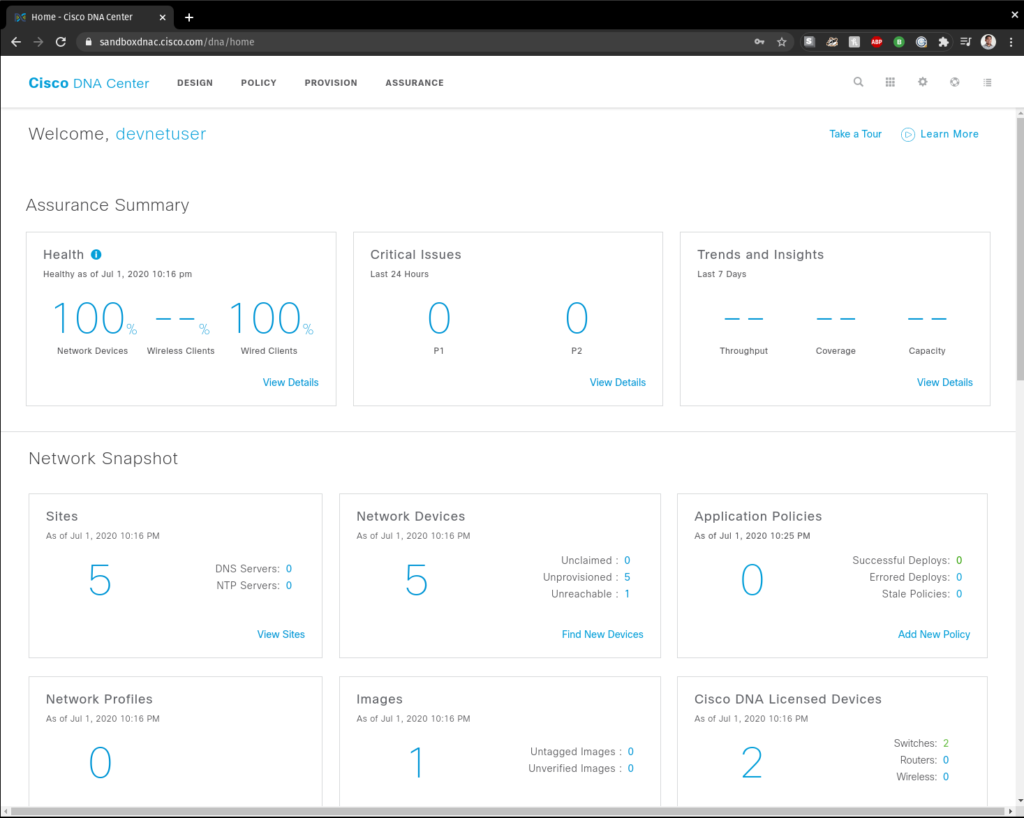
If you are studying for your Cisco DevNet certification like I am, be sure to make use of developer.cisco.com. It is completely free to sign up and you get access to tons of labs and resources like the Devnet sandbox.
This is particular sandbox is for the Digital Network Architecture (DNA) Center (or DNAC as I hear it internally) and it allows us to run API calls against an existing infrastructure for free.
In a nutshell, the Sandbox Access is public. You can visit the URL below with the login credentials to poke around or run APIs to interact with DNAC
- https://sandboxdnac.cisco.com
- Login: devnetuser/Cisco123!
Once you Log in, you should be able to interact with DNA Center

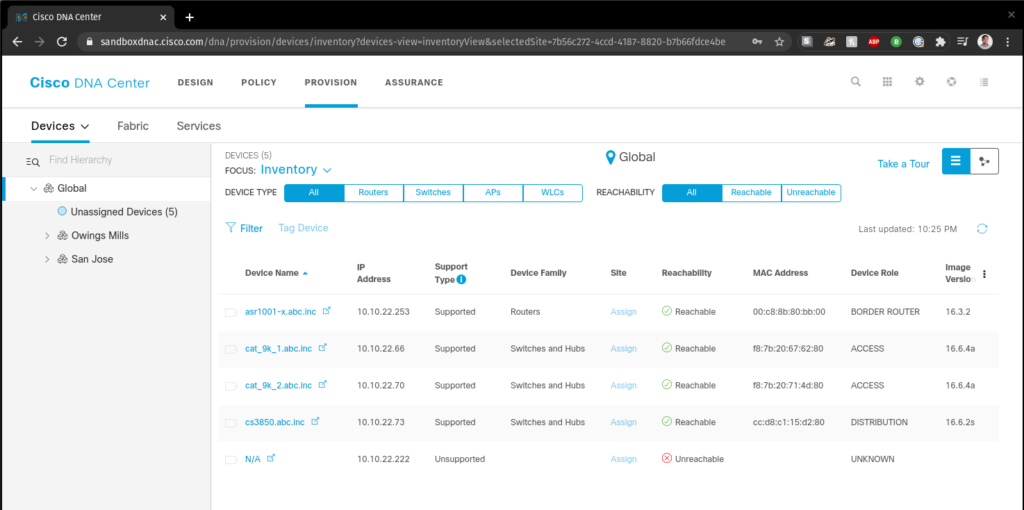
We can even view the inventory registered to DNAC:

Now to query any data via APIs from DNAC, we need some sort of authentication to log in. If you are following the DNAC Platform lab on developer.cisco.com, this is the first portion of the lab that walks you through on how to do this via Postman.
Fortunately the login credentials are public (devnetuser/Cisco123!), so we will use this to generate a x-auth-token via HTTP POST:
HTTP-GET and POST
Note: If you don’t feel like copy/pasting everything from here or the formatting is off, you can download this all from my github repo: https://github.com/mackyruiz/DevNet/tree/master/API_Auth-testing
DISCLAIMER: I’m not a developer and my Python skills is quite rusty. All this code was clobbered together by leveraging DevNet labs and Nick Russo’s videos on Pluralsight.
curl -X POST \
-u 'devnetuser:Cisco123!' \
-H 'Content-Type: application/json' \
https://sandboxdnac.cisco.com/dna/system/api/v1/auth/token
If you wrap all of the above into one bash script or run it by itself, you should get a token returned to you like so:
$ ./get_token.sh
{"Token":"eyJ0eXAiOiJKV1QiLCJhbGciOiJSUzI1NiJ9.eyJzdWIiOiI1ZTlkYmI3NzdjZDQ3ZTAwNGM2N2RkMGUiLCJhdXRoU291cmNlIjoiaW50ZXJuYWwiLCJ0ZW5hbnROYW1lIjoiVE5UMCIsInJvbGVzIjpbIjVkYzQ0NGQ1MTQ4NWM1MDA0YzBmYjIxMiJdLCJ0ZW5hbnRJZCI6IjVkYzQ0NGQzMTQ4NWM1MDA0YzBmYjIwYiIsImV4cCI6MTU5MzY3MTUyNywiaWF0IjoxNTkzNjY3OTI3LCJqdGkiOiI5NmE3MThmNi0yOTI1LTQzMzctYWE3NC0zZThjNjc2ZTVhN2EiLCJ1c2VybmFtZSI6ImRldm5ldHVzZXIifQ.WjqbhpDrHFYw4jQxAePOrekpHqfZWWFT-FlB-hdAl2TbhtxHLV8uFI6On2oCCSC6dt_L0S3ocyGjBHaO0FfmlLev8QgtKvYChnOa5ybuBhWrJM9gmn0LBa63Obvu5sdVB7qzVRxZnfAFq2rVj40w0yw2UvNP8AmanoA4p2cY0lSWfb4WwlueiocEqj8bz8TsRAXifGxX2xk1XUkzqu8O-it4N8_CA2Ha02n1gAshYVOxApngbRWh_078OLVjC0fg1N9kLKTqcldB4dm4YIn1zPuaIfa2kwE9aa3TUb8Siy8eOdI1bVNhc_P7yyMgJ49AuZd3rPMLhlmRJusRURbdhQ"}%
Great, now we have a token and it will be used to run authorized API requests on DNAC. Having this token also reduces the need to pass the username/password in every request
If I now take that long token and run a HTTP GET from https://sandboxdnac.cisco.com/dna/intent/api/v1/network-device, we should get a long request in JSON format
curl -X GET \
-H 'Content-Type: application/json' \
-H 'X-Auth-Token: eyJ0eXAiOiJKV1QiLCJhbGciOiJSUzI1NiJ9.eyJzdWIiOiI1ZTlkYmI3NzdjZDQ3ZTAwNGM2N2RkMGUiLCJhdXRoU291cmNlIjoiaW50ZXJuYWwiLCJ0ZW5hbnROYW1lIjoiVE5UMCIsInJvbGVzIjpbIjVkYzQ0NGQ1MTQ4NWM1MDA0YzBmYjIxMiJdLCJ0ZW5hbnRJZCI6IjVkYzQ0NGQzMTQ4NWM1MDA0YzBmYjIwYiIsImV4cCI6MTU5MzY3MTUyNywiaWF0IjoxNTkzNjY3OTI3LCJqdGkiOiI5NmE3MThmNi0yOTI1LTQzMzctYWE3NC0zZThjNjc2ZTVhN2EiLCJ1c2VybmFtZSI6ImRldm5ldHVzZXIifQ.WjqbhpDrHFYw4jQxAePOrekpHqfZWWFT-FlB-hdAl2TbhtxHLV8uFI6On2oCCSC6dt_L0S3ocyGjBHaO0FfmlLev8QgtKvYChnOa5ybuBhWrJM9gmn0LBa63Obvu5sdVB7qzVRxZnfAFq2rVj40w0yw2UvNP8AmanoA4p2cY0lSWfb4WwlueiocEqj8bz8TsRAXifGxX2xk1XUkzqu8O-it4N8_CA2Ha02n1gAshYVOxApngbRWh_078OLVjC0fg1N9kLKTqcldB4dm4YIn1zPuaIfa2kwE9aa3TUb8Siy8eOdI1bVNhc_P7yyMgJ49AuZd3rPMLhlmRJusRURbdhQ' \
https://sandboxdnac.cisco.com/dna/intent/api/v1/network-device/
{"response":[{"type":"Cisco ASR 1001-X Router","hostname":"asr1001-x.abc.inc","collectionInterval":"Global Default","inventoryStatusDetail":"","lastUpdateTime":1593653915066,"upTime":"147 days, 14:22:55.96","macAddress":"00:c8:8b:80:bb:00","deviceSupportLevel":"Supported","serialNumber":"FXS1932Q1SE","softwareType":"IOS-XE","softwareVersion":"16.3.2","interfaceCount":"0","lastUpdated":"2020-07-02 01:38:35","lineCardCount":"0","lineCardId":"","locationName":null,"managementIpAddress":"10.10.22.253","memorySize":"NA","platformId":"ASR1001-X","reachabilityFailureReason":"","reachabilityStatus":"Reachable","series":"Cisco ASR 1000 Series Aggregation Services Routers","snmpContact":"","snmpLocation":"","tagCount":"0","tunnelUdpPort":null,"waasDeviceMode":null,"roleSource":"AUTO","family":"Routers","errorCode":null,"associatedWlcIp":"","apManagerInterfaceIp":"","bootDateTime":"2020-02-05 11:16:35","collectionStatus":"Managed","errorDescription":null,"location":null,"role":"BORDER ROUTER","instanceTenantId":"5dc444d31485c5004c0fb20b","instanceUuid":"1cfd383a-7265-47fb-96b3-f069191a0ed5","id":"1cfd383a-7265-47fb-96b3-f069191a0ed5"},{"type":"Cisco Catalyst 9300 Switch","hostname":"cat_9k_1.abc.inc",
..
..
..
[Rest of output omitted]
Using Python
I will use the python requests library as it is the DevNet’s library of choice to make the API requests.
Dropping into my interactive python shell and importing requests, I can see that HTTP options like POST and GET are also available in dir(requests):
$ python3
Python 3.8.2 (default, Apr 27 2020, 15:53:34)
[GCC 9.3.0] on linux
Type "help", "copyright", "credits" or "license" for more information.
import requests
dir(requests)
['ConnectTimeout', 'ConnectionError', 'DependencyWarning', 'FileModeWarning', 'HTTPError', 'NullHandler', 'PreparedRequest', 'ReadTimeout', 'Request', 'RequestException', 'RequestsDependencyWarning', 'Response', 'Session', 'Timeout', 'TooManyRedirects', 'URLRequired', 'author', 'author_email', 'build', 'builtins', 'cached', 'cake', 'copyright', 'description', 'doc', 'file', 'license', 'loader', 'name', 'package', 'path', 'spec', 'title', 'url', 'version', '_check_cryptography', '_internal_utils', 'adapters', 'api', 'auth', 'certs', 'chardet', 'check_compatibility', 'codes', 'compat', 'cookies', 'delete', 'exceptions', 'get', 'head', 'hooks', 'logging', 'models', 'options', 'packages', 'patch', 'post', 'put', 'request', 'session', 'sessions', 'status_codes', 'structures', 'urllib3', 'utils', 'warnings']
So if we import requests and create a function to pass the username/password to the same URL and utilize the same headers as the curl command earlier, we should have something like:
def get_token():
  api_path = "https://sandboxdnac.cisco.com/dna"  #URL
  auth = ("devnetuser","Cisco123!")               #Login credentials
  headers = {"Content-Type": "application/json"}  #Header type

  auth_resp = requests.post(                      #request library POST
     f"{api_path}/system/api/v1/auth/token", auth=auth, headers=headers
     )

  auth_resp.raise_for_status()            #Prints error if auth failure
  token = auth_resp.json()["Token"]                  #Retrieve the token
  return token                 #Creates a return statement for later use

def main():
  token = get_token()           #Gets token
  print(token)

if __name__ == "__main__":
  main()
Now that we have a Python program written to get the authentication token, we’ll import that in another program we’ll write to fetch the device inventory
import requests. This is going to network-device
from auth_token import get_token #Imports our other program from above
def main():
token = get_token()
api_path = "https://sandboxdnac.cisco.com/dna"
headers = {"Content-Type": "application/json", "X-Auth-Token": token}
#Note the different URL from our last programget_resp = requests.get(
f"{api_path}/intent/api/v1/network-device", headers=headers
)# This is to print out the same large JSON dump as our curl command
# import json; print(json.dumps(get_resp.json(), indent=2))
#This is a loop on just printing the device ID and IP address
if get_resp.ok:
     for device in get_resp.json()["response"]:
         print(f" ID: {device['id']} IP: {device['managementIpAddress']}")
else:
     print(f"Device collection failed with code {get_resp.status_code}")
     print(f"Failure body: {get_resp.text}")
if __name__ == "__main__":
  main()
Now we can just run one single Python that will query DNAC for the Inventory list but print the device ID and IP address via APIs. We broke up the process on authenticating so we can re-use this later for other needs in the future
$ python3 get_devices.py
ID: 1cfd383a-7265-47fb-96b3-f069191a0ed5 IP: 10.10.22.253
ID: 21335daf-f5a1-4e97-970f-ce4eaec339f6 IP: 10.10.22.66
ID: 3e48558a-237a-4bca-8823-0580b88c6acf IP: 10.10.22.70
ID: de6477ad-22a2-4daa-9941-eb61cecefb34 IP: 10.10.22.73
ID: f175831a-ad64-40f3-8c98-3f49c7cd7bd0 IP: 10.10.22.222
We can also verify the IPs by looking at the Web Interface and looking at the DNAC Inventory (screenshot #2 in the top of this page)
